1. The Idea (Design Phase)
⏳ Time: 15 minutes to several hours (or days!)
Every piece of pottery begins with an idea. Sometimes it's a fully formed sketch in a notebook, other times it's just a feeling or a need: a mug for morning coffee, a bowl to hold lemons, or a shape I saw in a dream. I ask myself what the piece will be used for, how it should feel in the hands, whether it should be light and airy or thick and sturdy. These questions shape every decision that follows.
This is the dreamy part. It sets the tone for everything that follows, from the clay I pick to the final glaze.This is where the journey begins.

2. The Build (Wheel Throwing or Hand-Building)
⏳ Time: 15 - 30 minutes per piece
Once the design is in mind, it’s time to bring it to life. This is where hand-building or wheel-throwing comes into play. I experimented with various hand-building techniques at first, but over time, I found my passion in wheel throwing.
There are two main ways to form a piece:
- Wheel throwing
This is what most people imagine when they think of pottery. The clay spins on a potter's wheel, and your hands guide it upward into shape. It's hypnotic, meditative, and strangely addictive. Centering the clay takes strength and focus, and even the slightest movement can change everything.
- Hand-building
This involves techniques like pinching, coiling, or slab construction. It’s more sculptural and intuitive. Great for unique forms, it allows more time to shape and tweak.
Personally, I fell in love with the wheel. There’s something about its rhythm that lets me lose track of time. But both methods are equally powerful.

3. Leather-Hard Stage
🕰️ 12–48 hours to reach leather-hard stage
After you shape the piece, it needs to dry a little—but not too much. At this leather-hard stage, the clay is firm but still workable. This is when I carve, add handles, trim, or just clean up the form. It’s delicate, and it teaches you patience.
Timing is everything: if it's too wet, it collapses; too dry, it cracks. Rushing here has consequences (ask me how I know), so I’ve learned to wait for the clay to tell me it’s ready.

4. Trimming & Details
⏳ Time: 15–20 minutes per piece
Once the clay is leather-hard, I trim the base of the piece—especially if it was wheel-thrown. This makes the bottom lighter, more elegant, and functional. I might carve a foot ring, refine the shape, or sign the bottom.
This is also when I clean up any rough edges and fix tiny imperfections. What looks small now can become much more noticeable after firing, so this stage is about attention to detail.
Cleaning at this stage is also essential, as any small imperfections can become pronounced after firing. The mess turns into form, and that always feels a little like magic.
5. Bone Dry (Completely Dry Clay)
🕰️ Drying time: 2–7 days
The piece now needs to dry completely before it can go into the kiln. This can take a couple of days or even a week, depending on the size and humidity.
When bone dry, the clay is fragile like chalk. It can't be reshaped or fixed anymore, so it has to be handled gently. This is a risky phase: cracks can appear if the drying wasn’t even or if the piece was made too thick or thin.
6. First Kiln Firing (Bisque)
⏳ Firing: 8–10 hours
🕰️ Cooling: 12–24 hours
The first firing is called bisque firing. The bone-dry pottery goes into the kiln and is slowly heated to around 950–980°C (about 1750–1800°F). This transforms the clay from a soft, porous material into a durable ceramic body.
It becomes sturdy but still porous enough to absorb glaze. When I open the kiln after this stage, the pieces feel different: they’re no longer clay, but not quite finished.

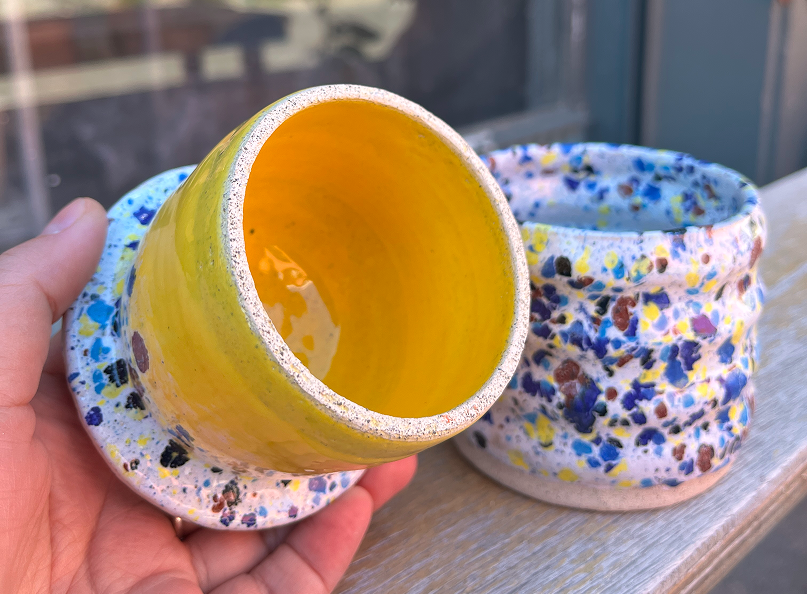
7. Glazing (aka Colour Alchemy)
⏳ Time: 5 minutes – 30 min per piece + glaze prep
🕰️ Drying time before glaze firing: 24 hours
This part? This is where I go wild. Glazing used to scare me—I stuck to underglazes and clear coats because I knew what to expect. But then I started mixing, layering, chasing textures and reactions. I became obsessed. Glaze is chemistry, chaos, and art rolled into one. Sometimes it’s heartbreak. Sometimes it’s pure lava magic. But it’s never boring.
Glaze is a mix of minerals, glass-forming materials, and sometimes metal oxides that create color and texture. It’s applied by brushing, dipping, pouring, or spraying. It’s unpredictable and wild. Glaze can run, change color, or pool in beautiful ways.
This is also the stage where you can add decorations: painted designs, carved textures, or oxide washes to highlight details.
8. Final Glaze Firing (and Sometimes One More)
⏳ Firing: 10–12 hours
🕰️ Cooling: 24–36 hours
Once glazed, the pieces go back into the kiln for the glaze firing. This time, the temperature is higher—usually between 1200–1300°C (2190–2370°F), depending on the clay and glaze.
The final firing seals the deal. The glaze vitrifies, the piece transforms—again. During this firing, the glaze melts and becomes glassy, fusing with the ceramic body. It seals the piece, making it waterproof, food-safe, and giving it that finished look.
Opening the kiln after a glaze firing is the most thrilling and nerve-wracking part (no matter how many times I do this). You never fully know what’s inside until it’s there in front of you. Every piece is a surprise. The colors might have shifted, blended, or bloomed in unexpected ways. Sometimes it works beautifully. Sometimes it doesn't. And sometimes, just sometimes, you get exactly what you dreamed of.
(And yes, sometimes there’s a third firing—for luster or gold, or just because I can’t leave it alone.)
So, how Long Does It All Take?
➡️ Total Time: 3–4 weeks per piece, depending on drying, kiln schedules, and finishes.
Come Get Muddy in Larnaca
If you’ve made it this far, maybe you’d like to feel all this for yourself. We run weekend workshops in our little home studio in Larnaca, where you can get your hands in clay and go through this process yourself. You don’t need experience, just curiosity and a willingness to get a bit messy.
Or, if you’re more into collecting than making, we also offer a small collection of handmade pieces—each one born from this very process, with its own quirks, textures, and story.

Pottery is slow. It’s imperfect. It takes patience. But it teaches you to listen, to feel, and to trust the process. And in the end, you’re left holding something that started out as just a lump of mud—and somehow became magic.


.png)

.png)